Monday, March 25, 2013

Shams and a Mystery


OK, this has to be some sort of record - my energy this week overfloweth - more than one post in a week???  When I get going on one project it just multiplies! 

For weeks I've been looking for pillow shams to go with my new quilt.  Oh yes, I probably could have found matching ones - Tar-jay had one here and one there.  But I didn't really want to go matchy matchy.  So hunting for shams, looking at cloth, trying to figure out if I had something in my studio that would do.  Then I happened to remember a very soft cotton flannel blanket that was my mothers.  It was blanket stitched along the edges.  When I folded it and cut it in half, I only had to trim a few inches off one side and it was perfect for two shams.  AND matched the cream color in the quilt.  Seamed two sides and they were done.  Not quite staying closed at the ends like I wanted though so I just stitched up three pennies for each sham and sewed through both sides.  Worked like a charm.


Now for the mystery.  Of course you know what these are.  Or I should say, were.


But what in the world will they turn into?  Stay tuned.  The first one should be done by the end of next weekend.


Saturday, March 23, 2013

Before The Rain

Well spring may be here but it's wet and rainy today and at night will still be in the 30s.  Could be worse - it could be snowing LOL.  Here is more of the "yard art" that was put in this week at the front corner of the house. 


My handsome and handy grandson, Andrew, built me a bird condo - well a triplex - for Christmas this year.  It's made of old barn wood with metal roofing and is very cool looking.  But of course I had to gussy it up with some bird bling - old faucet handles, pieces of copper flowers from an old hummingbird feeder, an old bent silver spoon - you name it - it's on there LOL. 


Mr. Whimsey screwed the condo onto a piece of wood and mounted it on a garden post with black wrought iron hinges.  Then dug a two foot hole (not a small feat in our red Georgia clay) and secured the post with concrete.  So the birdies should have a nice home for many years to come.  We also planted sunflowers around the bottom so we'll see how those do (if this rain doesn't wash them away this weekend.

Hope the sun is shining where you are.  Have a great weekend!


Sunday, March 17, 2013

Gardening Isn't For Sissies!

And right now I'm a sissy!  I couldn't figure out whether to call this post "gardening isn't for old people", "oh my aching back", "I need a massage", or "thank you God I got it done for today"  LOLOLOL

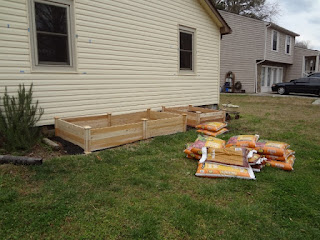
Last year we made our own raised bed planters out of (dare I say cheap) fiberboard built around pallets  that I knew wouldn't hold up too long.  As of this spring they were totally rotted and it was time for something that would last longer. 


So we found some food grade non-rotting (supposedly) cedar put-it-together-yourself-easily raised bed kits at Home Depot and decided that we wanted them a little deeper than the seven inches tall that they were.  These you could stack one on another and put them into many configurations.  So we now have one four by eight and one four by four that are fourteen inches tall.  I'm sure the neighbors are very relieved!


Now I will say it wasn't rocket science putting the kits together and you didn't need any tools except maybe a rubber mallet and then a screwdriver for the caps.  So that was a plus.  But the bending over putting them together for several hours when your back isn't wonderful in the first place was the minus.  And the shoveling - oh the shoveling. 

First shovel the dirt from one of the old planting beds into the other old planting bed, tear the first planting bed apart.  Put together two of the kits making the four by four.  And then shovel ALL of the dirt from the other old planting bed into the new one.  Add one bag of potting mix and one half bag of mushroom compost.  And rake it all smooth.  After all, last year with all of the dirt and amendments we put into the original beds - we couldn't waste a morsel of dirt - too expensive and too much good dirt LOL  Then tear down the second old planting bed, put three more kits together making the four by eight.  And then dump thirteen bags of potting mix and three and a half bags of mushroom compost into it and rake that smooth.  I think about six more bags of potting mix ought to do it.


By now you're probably saying - and what is wrong with the dirt in the ground where you live (and where the heck are your shutters)?  Well, we have solid rock-hard red Georgia clay - need I say more?  And the shutters are in the process of being painted a new color - will post those when they go back up.

To be perfectly honest here...Mr. Whimsey tore the old planting beds apart (he wanted to save the L brackets - can you say thrifty?) and he picked up most of the bags of potting soil and dumped them into the new bed once I (and my friend Teresa) unloaded them from the truck.

Even though my back is screaming "NOOOOOOOOOOOOOO MORE!!!", I'm still glad it's finally really spring here - or seems to be from the yellow pollen I started seeing on the car today.  Our tiny little fig tree has three branches and one full leaf as well as some buds. 


The ornamental peach is bursting into bloom and is full of buds.


 I have pineapple sage and Greek oregano planted in my herb garden, black hens and chicks in my old typewriter, and johnny-jump-ups in an old wood tray and three little pots.  The Carolina jessamine is gorgeous and smells wonderful too.


Bright orange cone flowers and lime green Euphorbia are planted by the yard bench.  I love Euphorbia - it looks like tiny bells. 


Thank you God and Mother Earth for your blessings!

PS  Can someone please come and finish weeding my herb garden?  LOLOLOL


Sunday, March 3, 2013

A Happy Mistake


And in conjunction with getting my new bed, the table that I had previously used as a beside table had to be put on the opposite of the bed.  Which means the telephone wouldn't quite reach it and I needed something to put the telephone on.  I just wanted something very small so began looking for a tiny table or stool or something that would work.  I found a small square metal table at Hobby Lobby that would do (and it was on sale so that was a bonus) but I wasn't especially crazy about it - a little too fancy on top.  After searching for something to put on the top - a basket or picture or.....whatever...and not finding anything, I decided I'd just paint a canvas with something or other on it and attach it to the top.


Now I do lots of crafting and lots of painting but not usually in conjunction with each other LOL  So I first covered the canvas in a very light blue.  Of course, since my studio was cold, I did that work on my kitchen counter next to the sink LOL  In the process of washing my hands I happened to drip a couple of drops of water onto the canvas while it was still wet.  Taking my brush I just brushed over them which caused the paint to be mostly removed in those spots.  Voila - I realized that if I did that all over the canvas, I could make it look a little time worn.  Yea - one of those happy mistakes!


Next I took a wet sea sponge and daubed the same blue all over the metal table.  Simple to do and much better looking than the brown/black it had been originally.

Once my canvas was dry, I took a dinner plate and drew around it, then free-handed the pattern on my bed quilt and painted it in similar colors.  Once dry, I covered it with a coat of sealant.  Shored up the bottom of the canvas with some wooden supports (so the phone wouldn't make it sag).  And fastened it to the top of the metal table with mounting putty (so it could be removed later if I needed to re-do anything).


I'm really thrilled with the way it turned out - just the perfect size for the phone and small enough to fit between the bed and wall.  One more project - DONE!


Now on to the next project LOL

Friday, March 1, 2013

It's Almost Here and I Don't Mean Spring!

Seven hours and counting until I'm off work for a whole week - yeeeeeeehaw!!!  And I'm not going to read work emails once while I'm off - I can hear my workmates falling off their chairs laughing at that statement.  REALLY guys, this time I mean it!  LOL

My beautiful daughter and I are going up to the north Georgia mountains to a cabin on a lake for our annual mother/daughter retreat for a few days next week.  Antiquing, crafting, eating, relaxing - what could be better!  Hopefully the weather will be good enough on Wednesday that we can pick up my step-father from assisted living and take him to the cabin to have dinner with us.  It should be a fun week.


And something that is already here rather than almost here - my new sleep number bed.  After several years of my old mattress just becoming more and more uncomfortable, I decided to get the exact bed I need for me.  It takes all the pressure off my back - is so comfortable - AND the back raises up (as well as the foot) so that I can read in bed easily - which is something I do almost every night before I go to sleep.  I've only had it for two nights but it is supreme luxury I can tell you.  I WILL miss the bed while I'm up at the cabin!

I hope everyone has a wonderful week - spring is on the way too - trees are beginning to bloom here - so it has to be wonderful - rain or not!